Two winters ago a quarter-inch poly line under my kitchen sink let go at 2pm on a Saturday. I was home. I heard it, I crawled under the cabinet, I turned the angle stop, and I still spent the afternoon with a wet vac and three beach towels. Total damage: one warped cabinet base and a bruised ego.
Then I started reading about what happens when nobody is home. A burst washing machine hose pushes something like 6 gallons a minute. A failed water heater can dump 50 gallons and then keep running because the supply line never stops. The horror stories on r/homeassistant all rhyme: a slab leak found after the water bill, a finished basement found after a weekend away, a $15,000 insurance claim that a $15 sensor would have caught.
I already had leak sensors. What I did not have was a valve that would actually do something about it. This is the build log for closing that gap: leak sensors that trigger a motorized main shutoff, entirely locally, with a hardware failsafe underneath so it works even when Home Assistant does not.
Why Not Just Buy a Moen Flo
The obvious off-the-shelf answer is the Moen Flo. It is a genuinely good product. It installs inline on your main, monitors flow rate, learns your usage patterns, and shuts off automatically when it sees an anomaly. I almost bought one.
What stopped me was the cloud. The Flo’s smarts live on Moen’s servers, and in late 2025 Moen migrated everyone from the old “Flo by Moen” app to the new Moen Smart Water Network app. That migration broke the existing Home Assistant integration for a lot of people, and the threads about it are still open. When your flood-prevention device depends on a vendor’s account system, a vendor’s app migration can take your protection offline and you find out at the worst possible time.
I wanted the shutoff logic to live on my own hardware. If my internet is down, if Zooz goes out of business, if a cloud API changes, the valve still has to close when the floor gets wet. That rules out anything cloud-dependent and points at Z-Wave.
To be clear: if you want flow monitoring and leak-by-usage-pattern detection and you are fine with the cloud dependency, the Flo is the easier buy and I would not talk you out of it. This build is for people who want local control and are willing to assemble it.
What I’m Building
The system has three layers:
- Detection. A handful of Z-Wave leak sensors placed at the usual suspects: under both sinks, behind the toilet, next to the washing machine, and on the floor by the water heater.
- Action. A motorized actuator bolted onto the main water shutoff valve. When Home Assistant sees a leak, it tells the actuator to turn the valve closed.
- Failsafe. A wired leak probe connected directly to the actuator’s own input terminals, so the valve closes in hardware even if Home Assistant, Z-Wave, and my network are all down at once.
Layer 3 is the part most DIY writeups skip, and it is the part that lets me actually trust this thing while I am on a plane.
Hardware
- A Zooz ZAC36 Titan Water Valve Actuator. This is the star of the build, about $70. It is a motor with a mounting bracket that clamps onto your existing quarter-turn ball valve and physically rotates the handle. It is Z-Wave, it is fully local, and critically it has two screw terminals for a wired leak probe (the failsafe).
- Three to five Zooz ZSE42 800LR leak sensors, roughly $20 each. These are tiny, run for years on a coin cell, and report over Z-Wave Long Range so the one in the detached-garage utility sink still reaches the hub.
- A Zooz ZST39 LR 800 Series Z-Wave stick if you do not already have a Z-Wave coordinator. I reviewed this stick separately and it is my current pick. About $30.
- Optionally, a quarter-turn brass ball valve if your main shutoff is an old gate valve with a round wheel handle. The Titan only works on quarter-turn (lever) valves.
Total for a real installation: about $150 to $200 depending on how many sensors you scatter. That is a tenth of one insurance deductible.
Step 1: Check Your Valve Clearance Before You Buy Anything
This is the step everybody skips and then returns the actuator over. The Titan needs physical room to mount and swing. Before you order, go look at your main shutoff and measure:
- 3 inches of clearance to each side from the center of the valve.
- 1 inch of clearance between the pipe and the wall behind it.
- At least 1.25 inches between the valve handle and the pipe.
- The valve has to be a quarter-turn lever valve, not a gate valve. The pipe itself needs to be in the 0.5 inch to 1.25 inch diameter range.
If your main is jammed three inches from a stud in a cramped crawlspace, this is a problem to solve before the hardware shows up, not after. In my case the main is in the garage with plenty of room, so this was a non-issue. My utility sink valve was tighter and I had to move a shelf bracket.
If you have a gate valve, budget an hour (or a plumber) to swap it for a ball valve. SharkBite-style push-fit ball valves make this a no-solder job for most copper or PEX, but know your pipe and your local code before you cut.
Step 2: Mount the Titan and Power It
Mounting is genuinely tool-light. The bracket clamps around the valve body, the actuator’s drive cup slips over the lever handle, and you tighten two bolts. The whole thing took me about ten minutes. The Titan is mains-powered through an included adapter, so you need an outlet within reach of the main. I added a short outdoor-rated extension to a nearby receptacle.
One thing to get right: install the actuator with the valve in the open position and let the device learn its open and closed endpoints during the calibration cycle. The Titan figures out how far to rotate by feeling for the mechanical stops. If you mount it half-turned, the endpoints are wrong and it throws a fault.
Step 3: Pair It Into Z-Wave JS
With the Zooz stick already running in Z-Wave JS, pairing the Titan is the usual dance: put Z-Wave JS into inclusion mode, scan the QR sticker on the device for S2 security, and wait for interview to finish. The Titan interviews slowly because it has a lot of endpoints and config parameters, so give it two or three minutes before you panic.
When it lands in Home Assistant you get, among other entities:
- A switch entity for the valve. By Zooz’s convention, on = open and off = closed. This trips people up, so write it on a sticky note. Closing the valve means turning the switch off.
- A couple of sensor entities for the device’s own wired-probe state and fault reporting.
Some Z-Wave JS versions surface the valve under the newer valve domain instead of switch. Either works. I am using the switch entity below because that is what mine exposed.
Step 4: The Automation
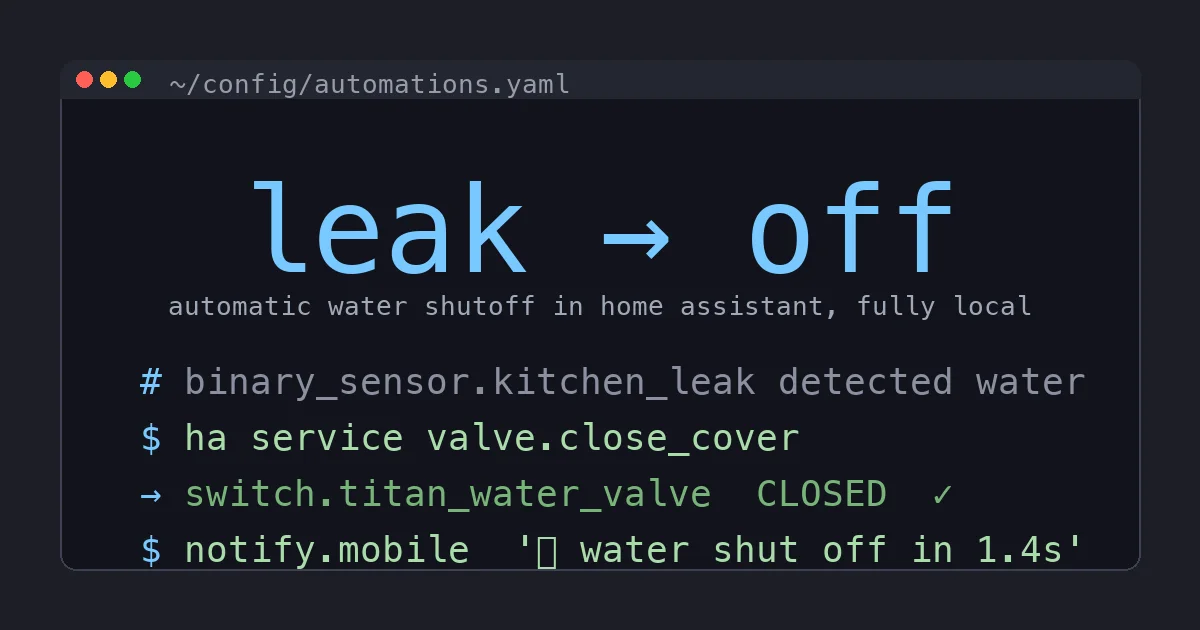
Here is the core automation. It watches every leak sensor and, on any of them going wet, closes the valve and fires a loud notification.
automation:
  - alias: "Water leak: close the main valve"
    trigger:
      - platform: state
        entity_id:
          - binary_sensor.kitchen_sink_leak
          - binary_sensor.water_heater_leak
          - binary_sensor.washer_leak
          - binary_sensor.bathroom_leak
        to: "on"
    action:
      - service: switch.turn_off
        target:
          entity_id: switch.titan_water_valve
      - service: notify.mobile_app_pixel
        data:
          title: "Water shut off"
          message: >
            Leak detected at {{ trigger.to_state.name }}.
            Main valve closed automatically.
      - service: notify.persistent_notification
        data:
          title: "Water valve closed"
          message: "Investigate before reopening the main."
Note the deliberate choice not to auto-reopen the valve. Reopening is a human decision. If a sensor went wet there is standing water somewhere, and I want eyes on the problem before water pressure comes back. The notification is loud and the persistent notification stays in the dashboard until I clear it.
I also keep a separate one-line script bound to a dashboard button to reopen the valve once I have confirmed things are dry:
script:
  open_water_main:
    alias: "Open water main"
    sequence:
      - service: switch.turn_on
        target:
          entity_id: switch.titan_water_valve
Step 5: Wire the Hardware Failsafe
This is the layer that lets me actually trust the system. The Titan has two screw terminals for a wired leak probe. When that probe sees water, the actuator closes the valve in hardware, with no involvement from Home Assistant, Z-Wave routing, or my network. Hub down, internet down, power flickering: does not matter, the valve still closes.
I ran the wired probe to the single highest-risk spot in the house, the floor pan under the water heater, because a water heater failure is both the most likely big leak and the most expensive. The Z-Wave sensors cover everywhere else with the smart automation, and the hardware probe covers the one place I refuse to gamble on.
Think of it as defense in depth. The smart layer is faster and covers more locations. The hardware layer is dumber but unkillable. You want both.
Step 6: Exercise the Valve So It Never Seizes
A motorized valve that sits in the open position for two years can build mineral scale and get stiff, and the first time it tries to move is the moment you least want it to discover it cannot. So I exercise it on a schedule.
automation:
  - alias: "Monthly water valve exercise"
    trigger:
      - platform: time
        at: "03:00:00"
    condition:
      - condition: template
        value_template: "{{ now().day == 1 }}"
    action:
      - service: switch.turn_off
        target:
          entity_id: switch.titan_water_valve
      - delay: "00:00:10"
      - service: switch.turn_on
        target:
          entity_id: switch.titan_water_valve
At 3am on the first of every month it closes the valve, waits ten seconds, and reopens it. If the motor ever reports a fault because the valve got stiff, I find out on a quiet Tuesday with time to deal with it, instead of during an actual emergency. This single automation is the difference between a system you set up once and a system you can actually rely on years later.
What It Cost Me, and What It Saved
My parts came to about $180: the Titan, four ZSE42 sensors, and I already had the Zooz stick. Install was an afternoon, most of which was running the wired failsafe probe neatly and arguing with a shelf bracket.
Since then it has fired for real exactly once: a slow drip from a water heater fitting that the wired probe caught at maybe a cup of water on the floor. The valve closed, my phone lit up, and I tightened a fitting instead of replacing drywall. One event paid for the whole thing several times over.
The Bottom Line
If you want flow monitoring, anomaly detection, and a clean inline install and you are comfortable with a cloud account, buy the Moen Flo and move on with your life. It is a good product and not everyone wants to assemble their own.
But if you run Home Assistant and you want flood protection that does not depend on a vendor’s servers, a vendor’s app migration, or your internet connection, the local build is the right call. The Zooz Titan bolted onto your existing valve, a scattering of ZSE42 sensors, one automation, and a wired failsafe probe gives you a system that closes the main in seconds and keeps working when everything else is down. That last property, working when everything else is down, is the entire point of flood prevention. Build it so it cannot be taken offline by someone else’s bad release, exercise it so it never seizes, and then mostly forget it exists until the day it saves your floor.